Compile and download
The OBP40 firmware can be easily customized to individual needs. The programming and development environment used is “PlatformIO.” The source code is centrally located on GitHub, where all software revisions are available. Current or older versions can be used as needed. Linux, Windows, and macOS are supported operating systems. There are two methods for compiling the firmware.
Using Github Codespaces (web-based in the cloud)
Visual Studio Code with PlatformIO plugin (local on the PC)
Note
The Arduino IDE is not used as a programming development environment because the source code is very complex and the Arduino IDE lacks a useful cross-referencing function. Necessary toolchains and libraries are linked in the correct version in PlatformIO, enabling error-free compilation.
GitHub Codespaces
GitHub Codespaces is a standardized, web-based, cloud-based development environment. This allows you to develop code on any computer with a modern web browser without installing any special software components. A GitHub account is required to use the service. Based on PlatformIO, the code development environment is always up-to-date. Dependencies on external libraries are automatically resolved and integrated. The system is ready to use immediately and is particularly suitable for beginners or for making small changes quickly on the go. The free version of GitHub Codespaces is free of charge, but it is subject to some limitations regarding usage time and available computer hardware. Currently, 120 hours of usage time per month are free, which is perfectly sufficient for simple changes. Users who need more time or want to use faster hardware can subscribe to GitHub Codespaces’ paid service. Further details can be found on the Webseite von Github Codespaces.
The workflow at Github Codespaces looks like this:
Fork the OBP60 GitHub project into its own GitHub repository
Open the GitHub Codespaces link to the project
Modify and compile source code in the development environment
Download des Binary-Files
Update the changes in your own GitHub repository
Github project forking
First, the original OBP60 project is forked into your own private repository. A fork is essentially a splitting or separation of the source code into a new branch. A fork creates a copy of the original project in your private repository. This allows you to make changes to the code and save them in your repository. The resulting code is then an extension or modification of the original project.
Hint
Only by creating a fork is it possible to save your own code changes.
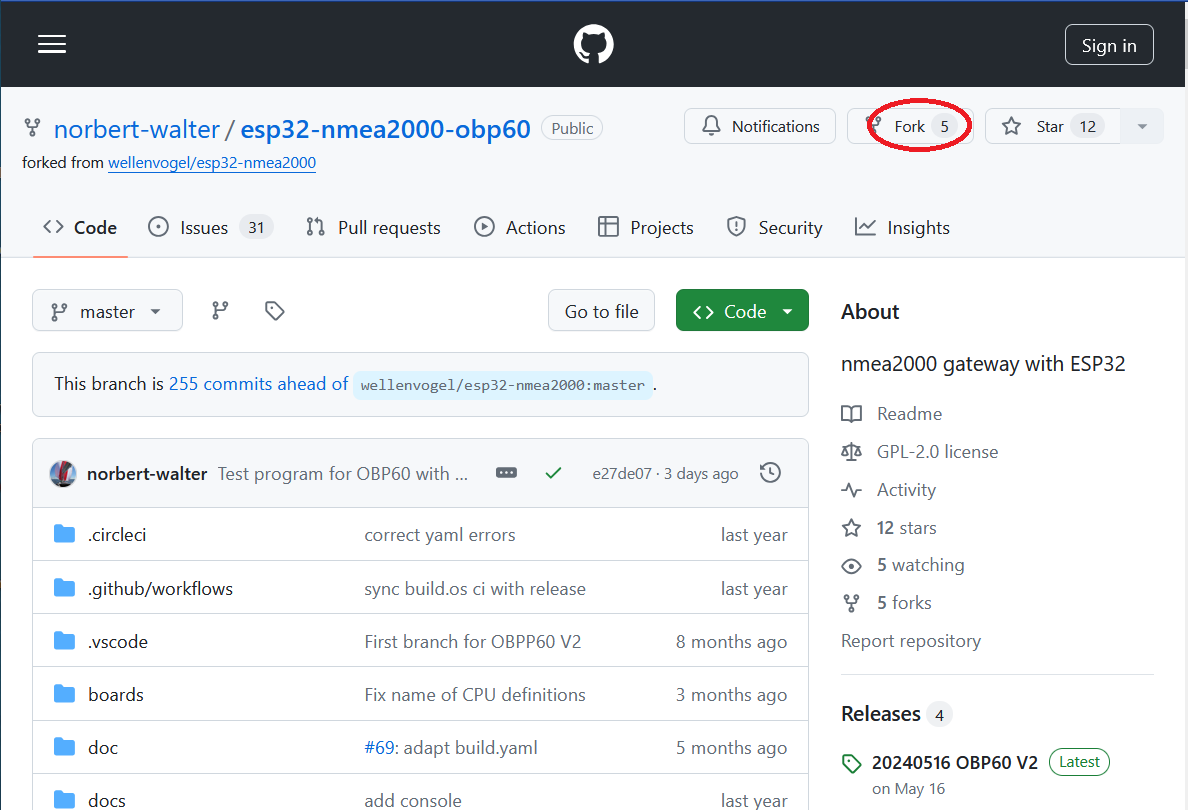
Fig.: Creating a fork
First, log in to GitHub and then go to `Original-Projekt zum OBP60`_ and click the Fork button in the upper right corner. You will then be asked if you trust the source and can choose to give a new project name or use the original project name. Next, copy the link to your GitHub project from the browser’s address bar. You should then have a link similar to this:
Https://github.com/MyAccountName/esp32-nmea2000-obp60/tree/master
The part MyAccountName will be replaced by their own account name.
Open GitHub Codespaces link
The GitHub Codespaces project is accessed from the repository page of your own GitHub project via the button Code -> Codespaces -> Create codespace:
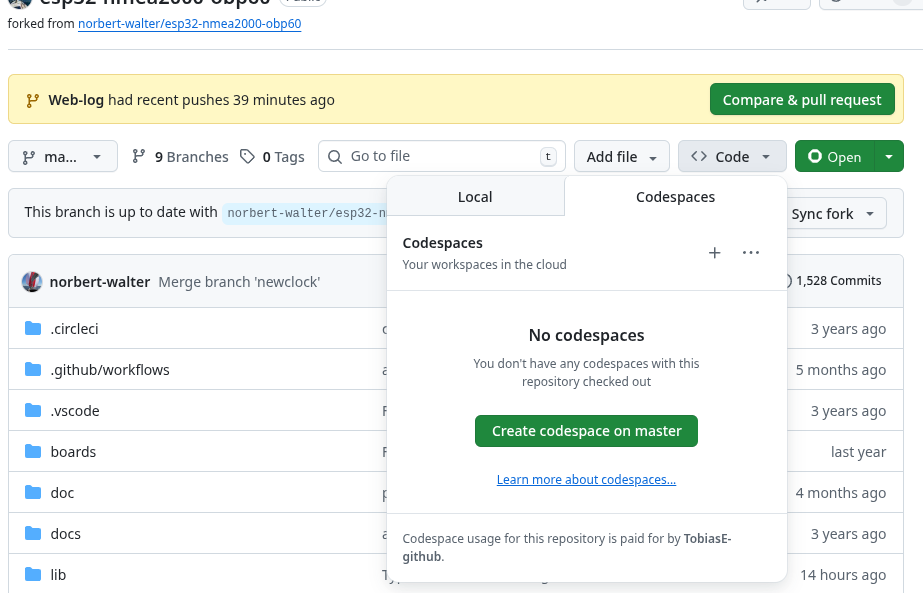
You will then be taken to the Github Codespaces homepage.
Container-Start
When you start GitHub Codespaces, a new Docker container is launched, and all necessary software components are automatically loaded into the container. This process may take some time. At the end, you should have a fully configured workspace. The workspace has the look and feel of Visual Studio Code. You can modify and compile the code and download the binary from within the workspace. Downloading the binary to the target hardware requires external tools.
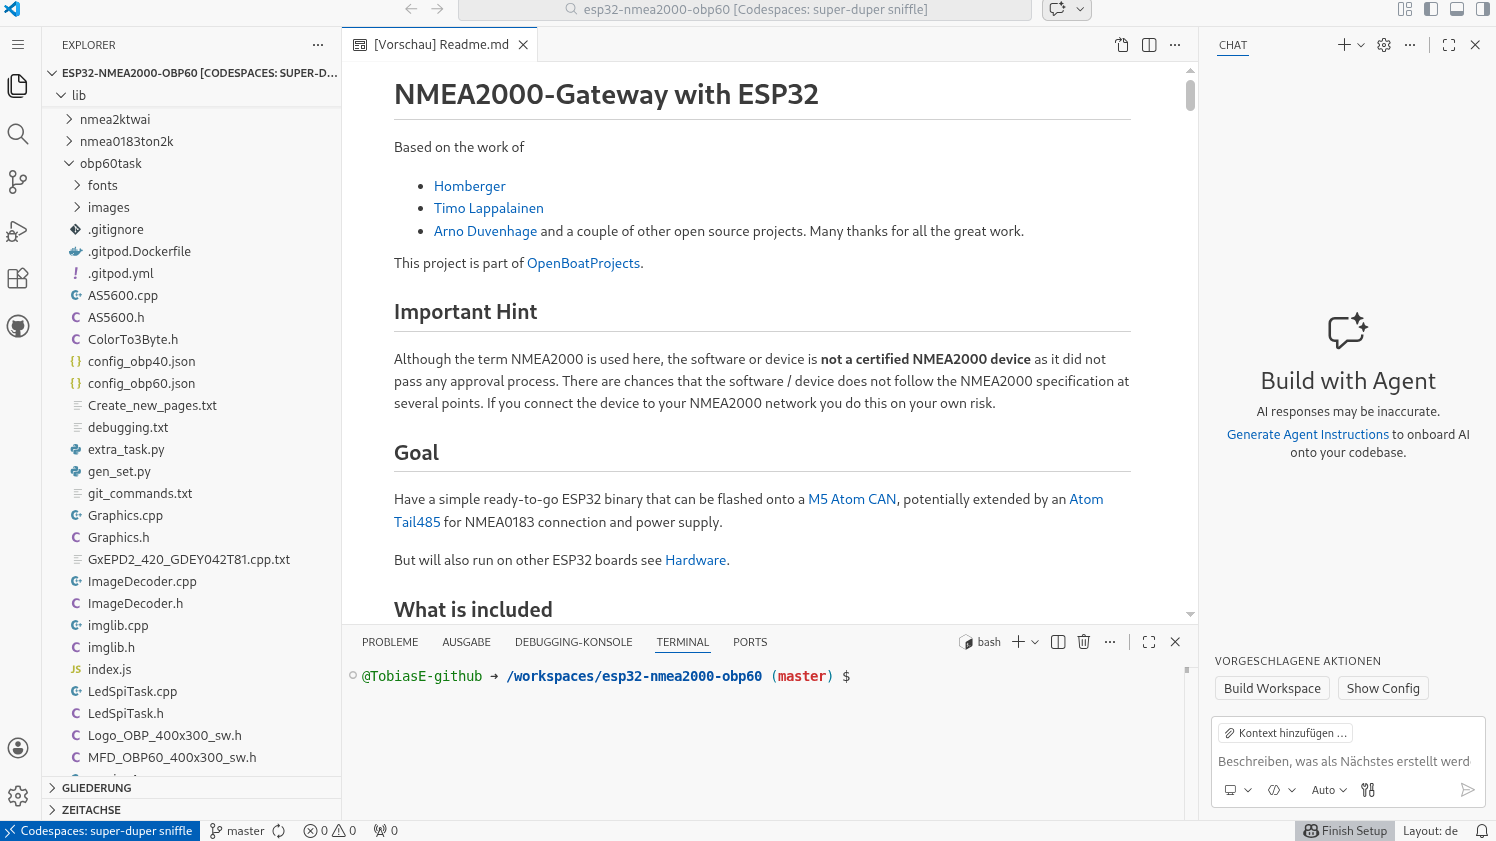
Fig.: Finished Workplace
Code modification and compilation
The code for the OBP40 is located in the folder: /ESP32-NMEA2000-OBP60/lib/obp60task . By editing the file platformio.ini, some hardware adjustments can be made for the ESP32-S3 variant and the e-paper display.
To compile the code, you must paste the following commands one after the other into the terminal window in the bottom right corner. You can use the copy and paste function for this.
Cd /workspaces/esp32-nmea2000-obp60
Bash /workspaces/esp32-nmea2000-obp60/lib/obp60task/run_install_tools
Bash /workspaces/esp32-nmea2000-obp60/lib/obp60task/run_obp40_s3
After the second command, all necessary toolchains and libraries are loaded into the Workplace. This process can take several minutes. The actual compilation process begins with the last command, which also takes some time. If you later modify the code and want to recompile, simply use the last command again.
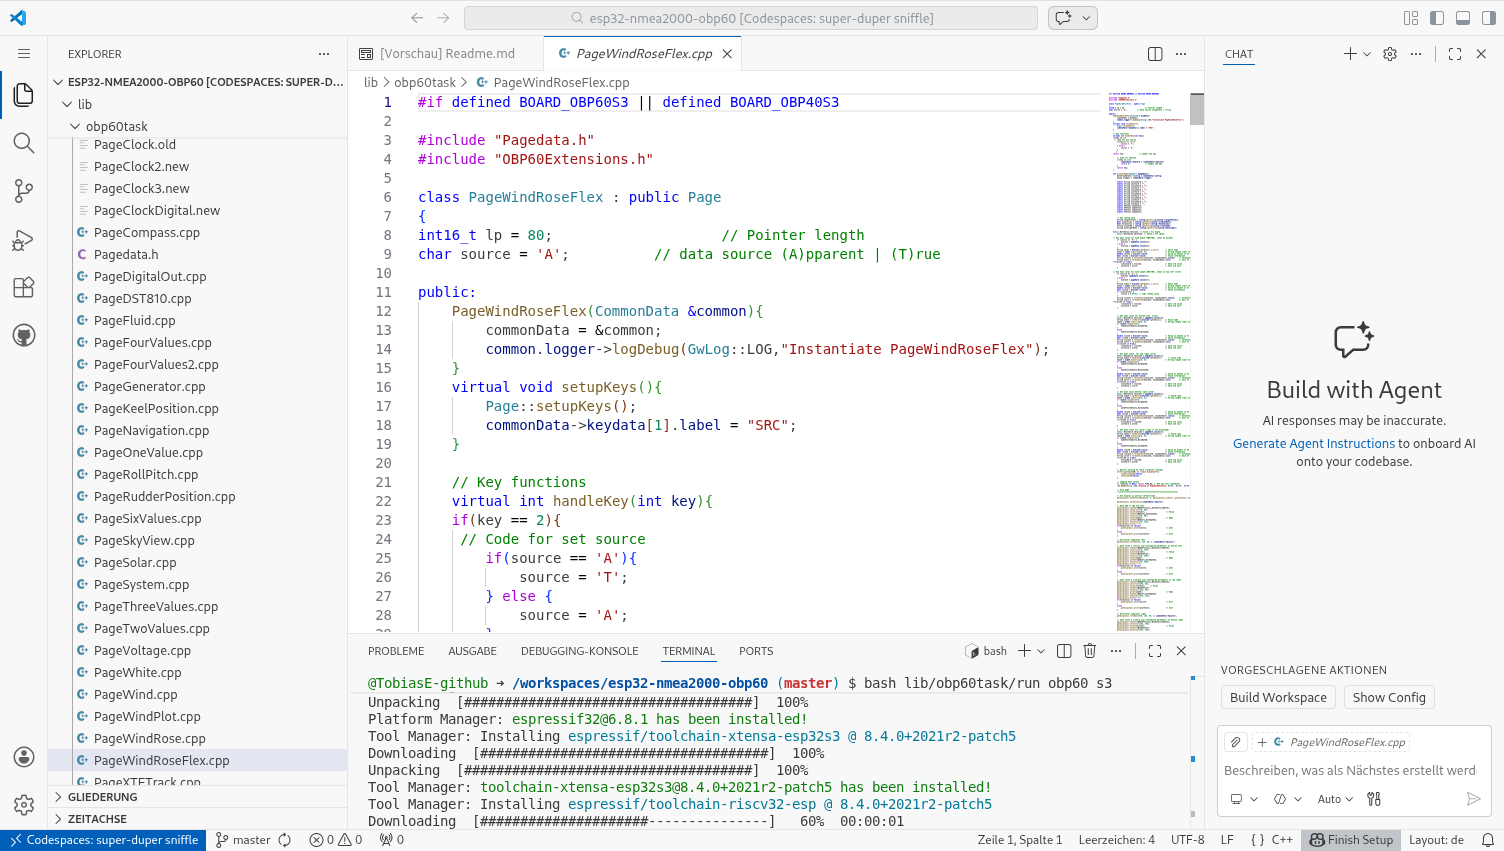
Fig.: Compiling source code
If the compilation process is successful, you should see the following message:
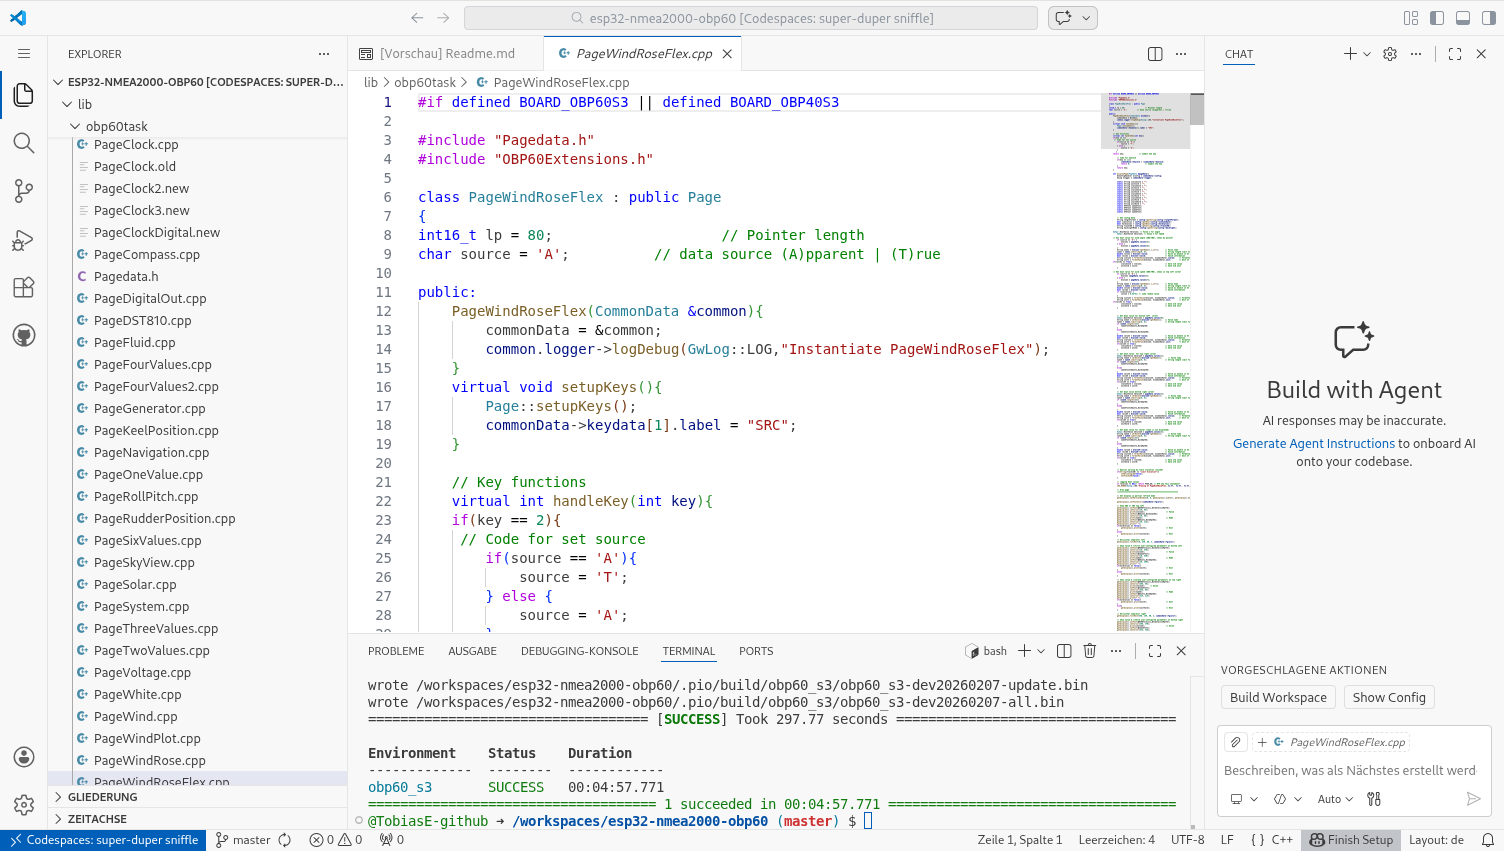
Fig.: Compilation complete
Binary-Download
The binary code for the firmware is located in the following directory after compilation:
/ESP32-NMEA2000-OBP60/.pio/build/obp40_s3 (for OBP40)
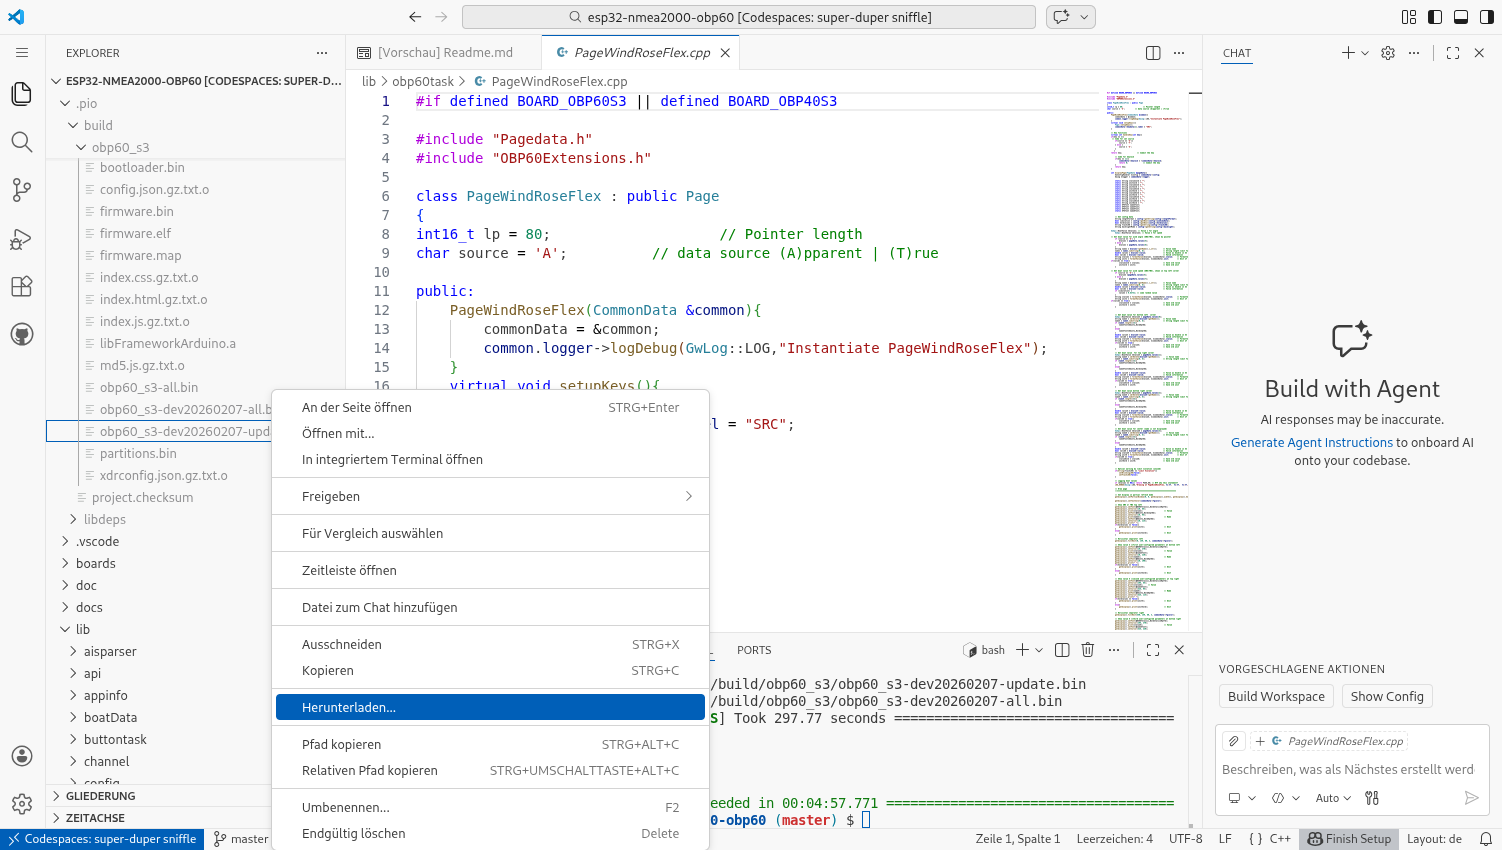
Image: File download
Hint
If you only see Einfügen in the selection menu and Herunterladen is missing, simply press Einfügen. You will then get the full menu with all selection options.
The files have the following meaning:
Bootloader.bin - ESP32-S3 Bootloader for Firmware
Partitions.bin - Partition table for flash memory
Firmware.bin - Binary file as an update (firmware only)
Firmware.elf - ELF file for error tracking
Obp40_s3-all.bin - Binary file containing all components (bootloader, partition table, firmware, default settings)
Obp40_s3-dev20240820-all.bin - like obp40_s3-all.bin
Obp40_s3-dev20240820-update.bin - Binary file as update (firmware only)
Depending on whether you want to start with default settings or continue working with the old settings, you can download one of the two files highlighted in bold. The easiest way to do this is to right-click the corresponding file in the file tree and then download it via Download. The update file can later be uploaded to the OBP40 via the website Update to update the firmware. The all file must be flashed via USB.
Source code update
To save source code changes to your GitHub repository, you can use the GitHub functionality of the Workplace. On the left, there’s an icon with a path branch and a small blue number next to it. This icon tells you how many changes have been made to files by the source code changes. Clicking the icon allows you to add a description for the changes. Following the dialog to the right of the blue Commit button, you can click Commit and Push. This uploads and saves the code changes to your GitHub repository. If you want to continue working where you left off, you can follow the steps from point 2 onwards and open the GitHub Codespaces link to your project.
Hint
You can only commit and upload changes to Github if you include a description of the code change.
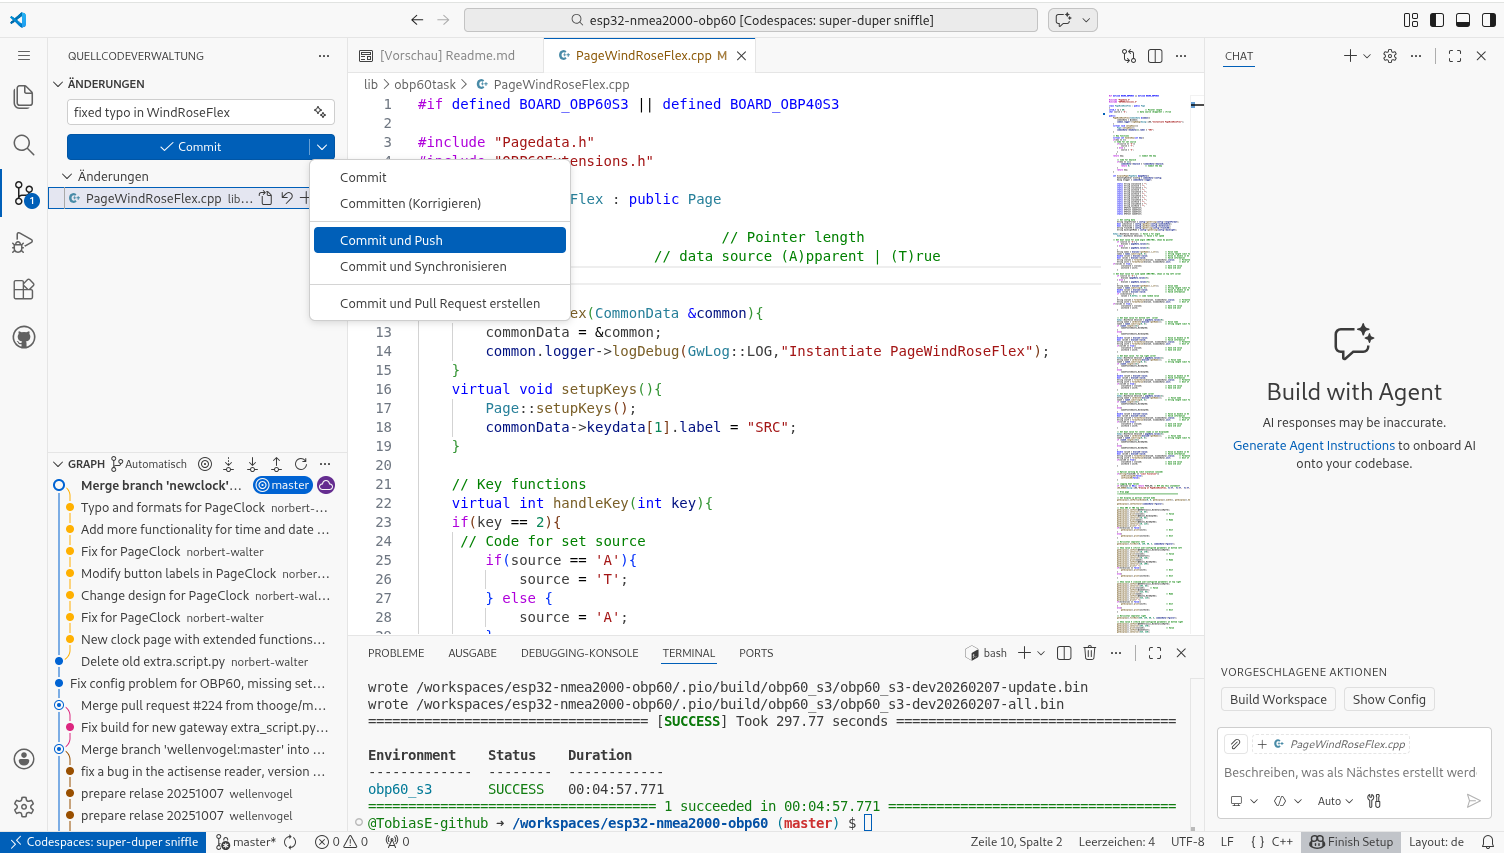
Fig.: Saving the source code to GitHub
Visual Studio Code / PlatformIO
Visual Studio Code (VSC) is a widely used software development environment that supports a variety of programming languages and is available for various operating systems. The development environment runs on a local PC. The PlatformIO plugin for Visual Studio Code was created for programming embedded electronics based on microcontrollers in C and C++. This makes it easy to develop software for hardware. A comprehensive database lists a large number of electronic hardware boards. The necessary toolchains and software libraries are automatically added to a project based on the hardware board, eliminating the need to worry about the details.
Hint
Anyone interested in further developing the OBP40 firmware should use Visual Studio Code / PlatformIO. Visual Studio Code has mechanisms that allow software changes to be implemented and tracked via GitHub.
This document Anleitung describes how to install Visual Studio Code and then set up the PlatformIO plugin. You can also find further descriptions on this topic online.
The workflow for Visual Studio Code looks like this:
Fork the OBP40 GitHub project into its own GitHub repository
Import project into Visual Studio Code
Modify and compile source code in the development environment
Flashing the firmware onto the target hardware
Debugging the firmware via serial USB connection
Update the changes in your own GitHub repository
Github project forking
First, the original OBP40 project is forked into your own private repository. A fork is essentially a splitting or separation of the source code into a new branch. A fork creates a copy of the original project in your private repository. This allows you to make changes to the code and save them in your repository. The resulting code is then an extension or modification of the original project.
Hint
Only by creating a fork is it possible to save your own code changes.
Fig.: Creating a fork
First, log in to GitHub, then go to `Original-Projekt zum OBP60`_ and click the Fork button in the upper right corner. You will then be asked if you trust the source, and you can then choose a new project name or use the original project name. Next, copy the link to your GitHub project from the browser’s address bar. You should then have a link similar to this:
Https://github.com/MyAccountName/esp32-nmea2000-obp60
The part MyAccountName will be replaced by your own account name.
Import project into VSC
You will initially find an empty Workplace. Click the Clone Repository button and enter the link to your GitHub project in the top line. Then click the Clone from GitHub line below.
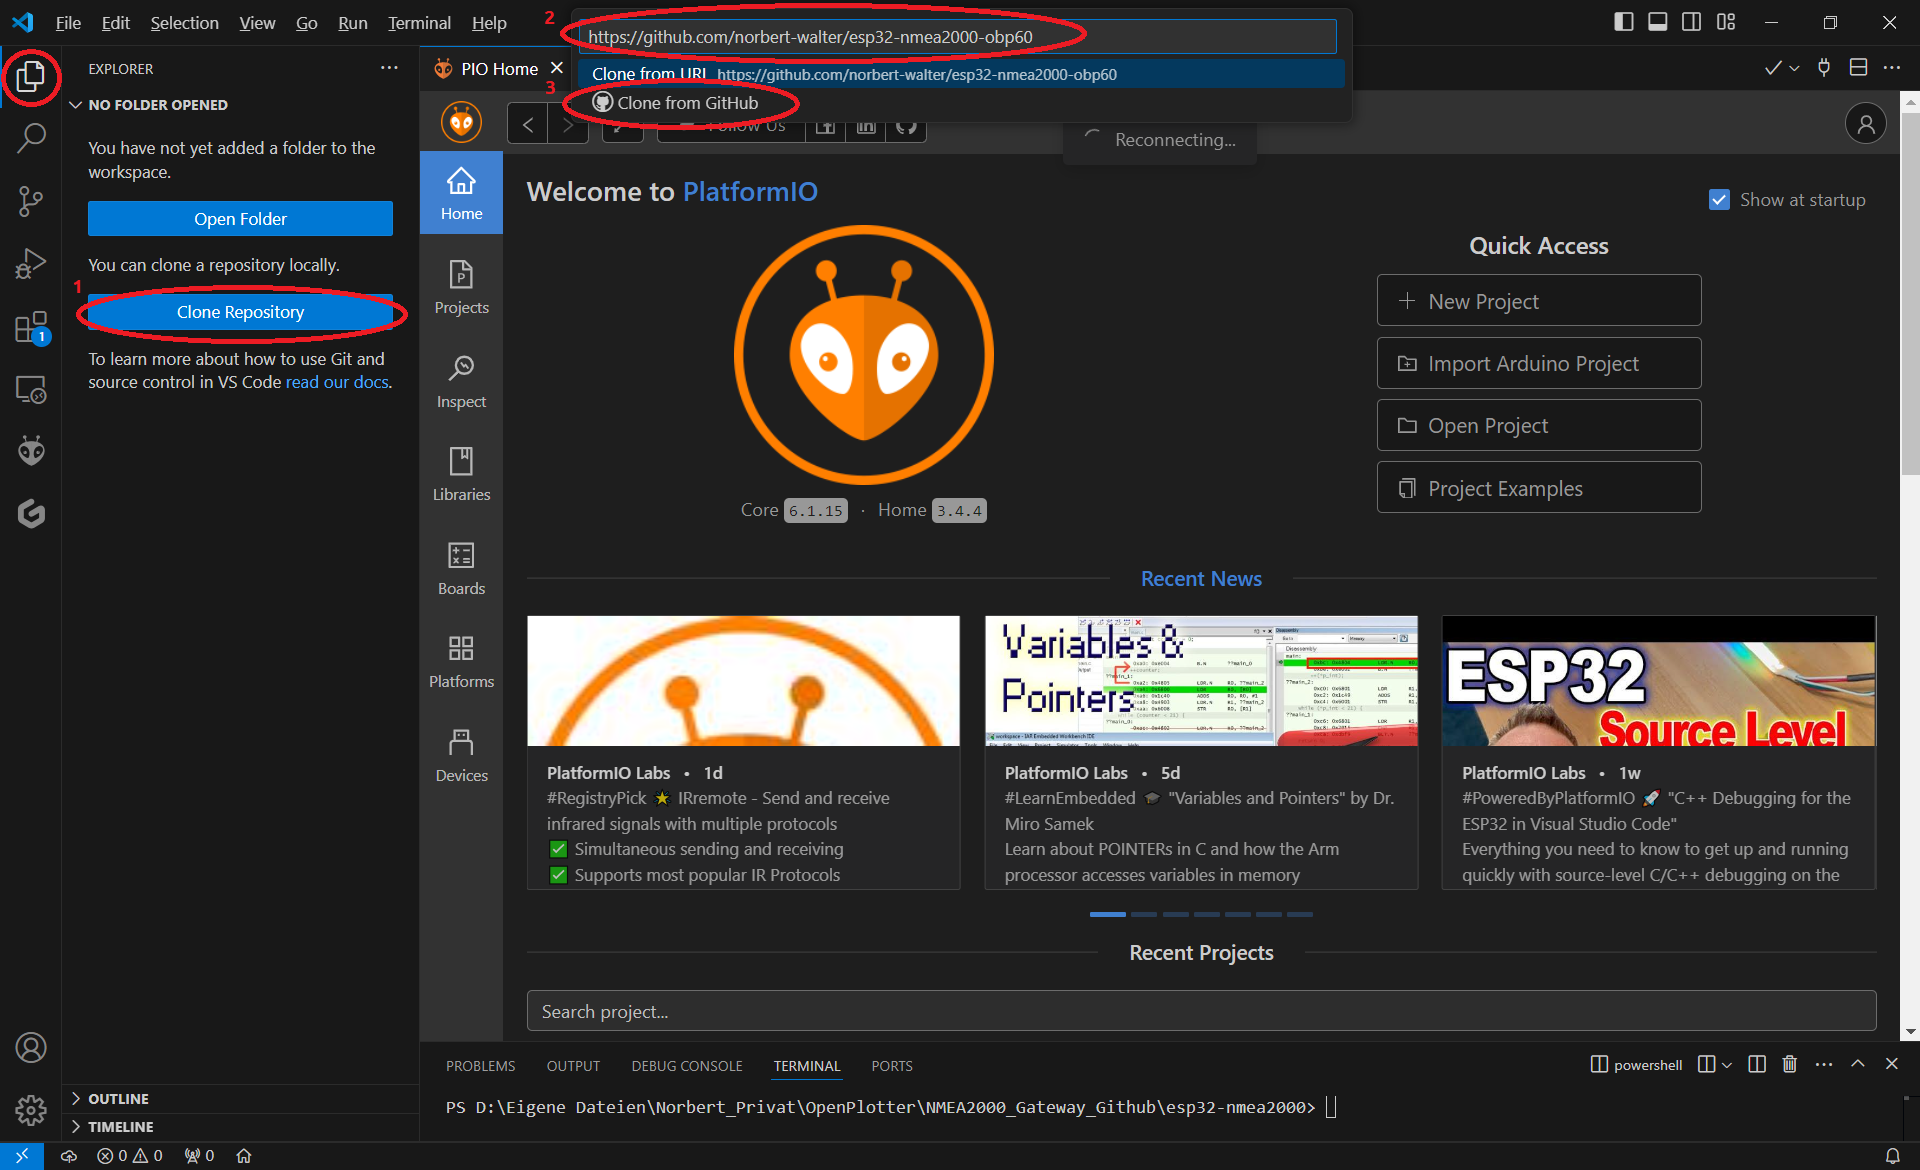
Fig.: Cloning a project
The project download will then begin, and after a short time, the project and its file tree will appear on the left side of the Workplace. Finally, a file named platformio.ini will open on the right. Close this file by clicking the “X” in the upper right corner of the window. This is the configuration file for the NMEA2000 gateway, which we don’t need in this case.
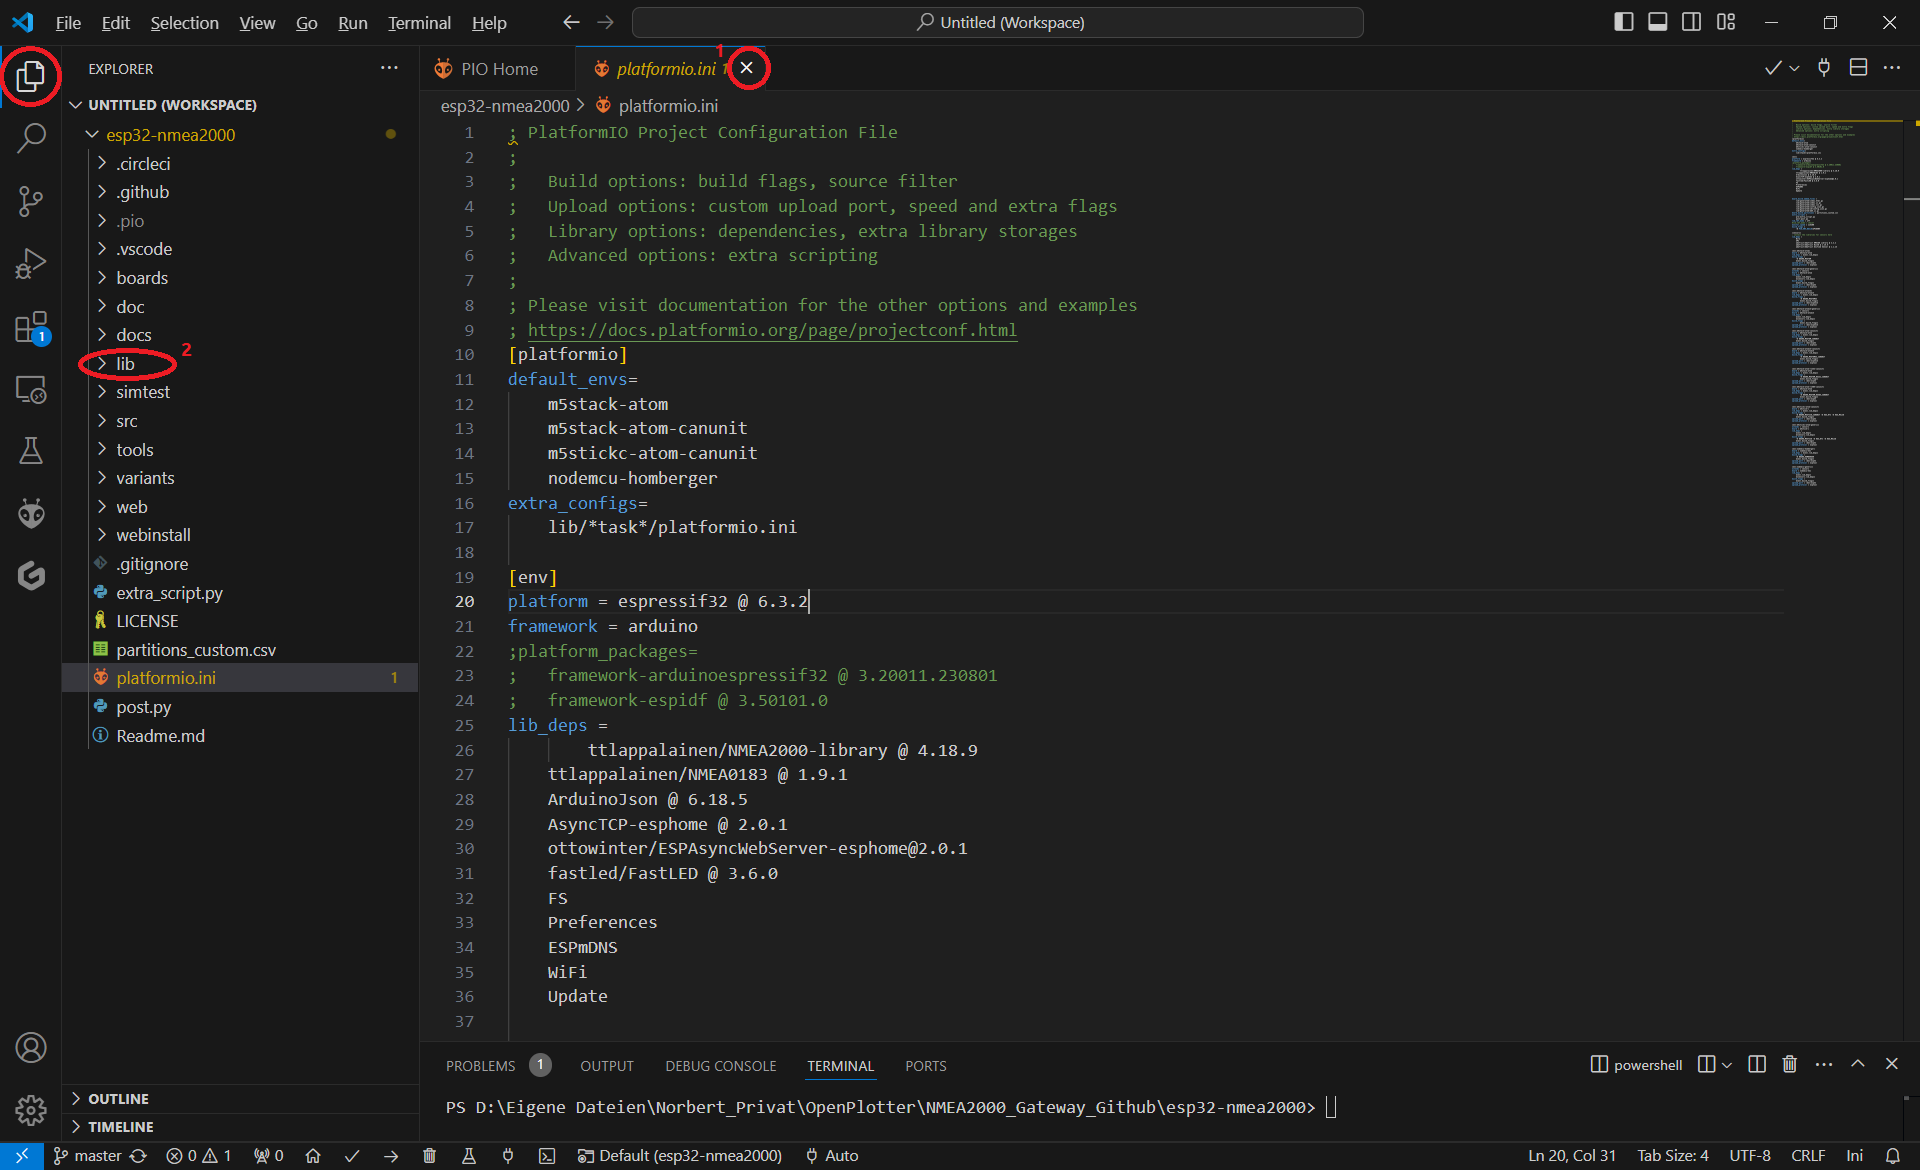
Fig.: Close configuration file
Then go to the file tree and open the path: /esp32-nmea2000-obp60/lib/obp60task and open the file platformio.ini, which belongs to the OBP40 project. In the file, change the serial interface to the port to which you have connected the OBP40. The interface names differ between Windows and Linux.
Windows: COMx
Linux: /dev/ttyACM0
Note
For Linux and Windows 10/11, the necessary USB drivers are integrated into the operating system. For older Windows 7/8 versions, you need zusätzliche Treiber to use your computer’s USB interface.
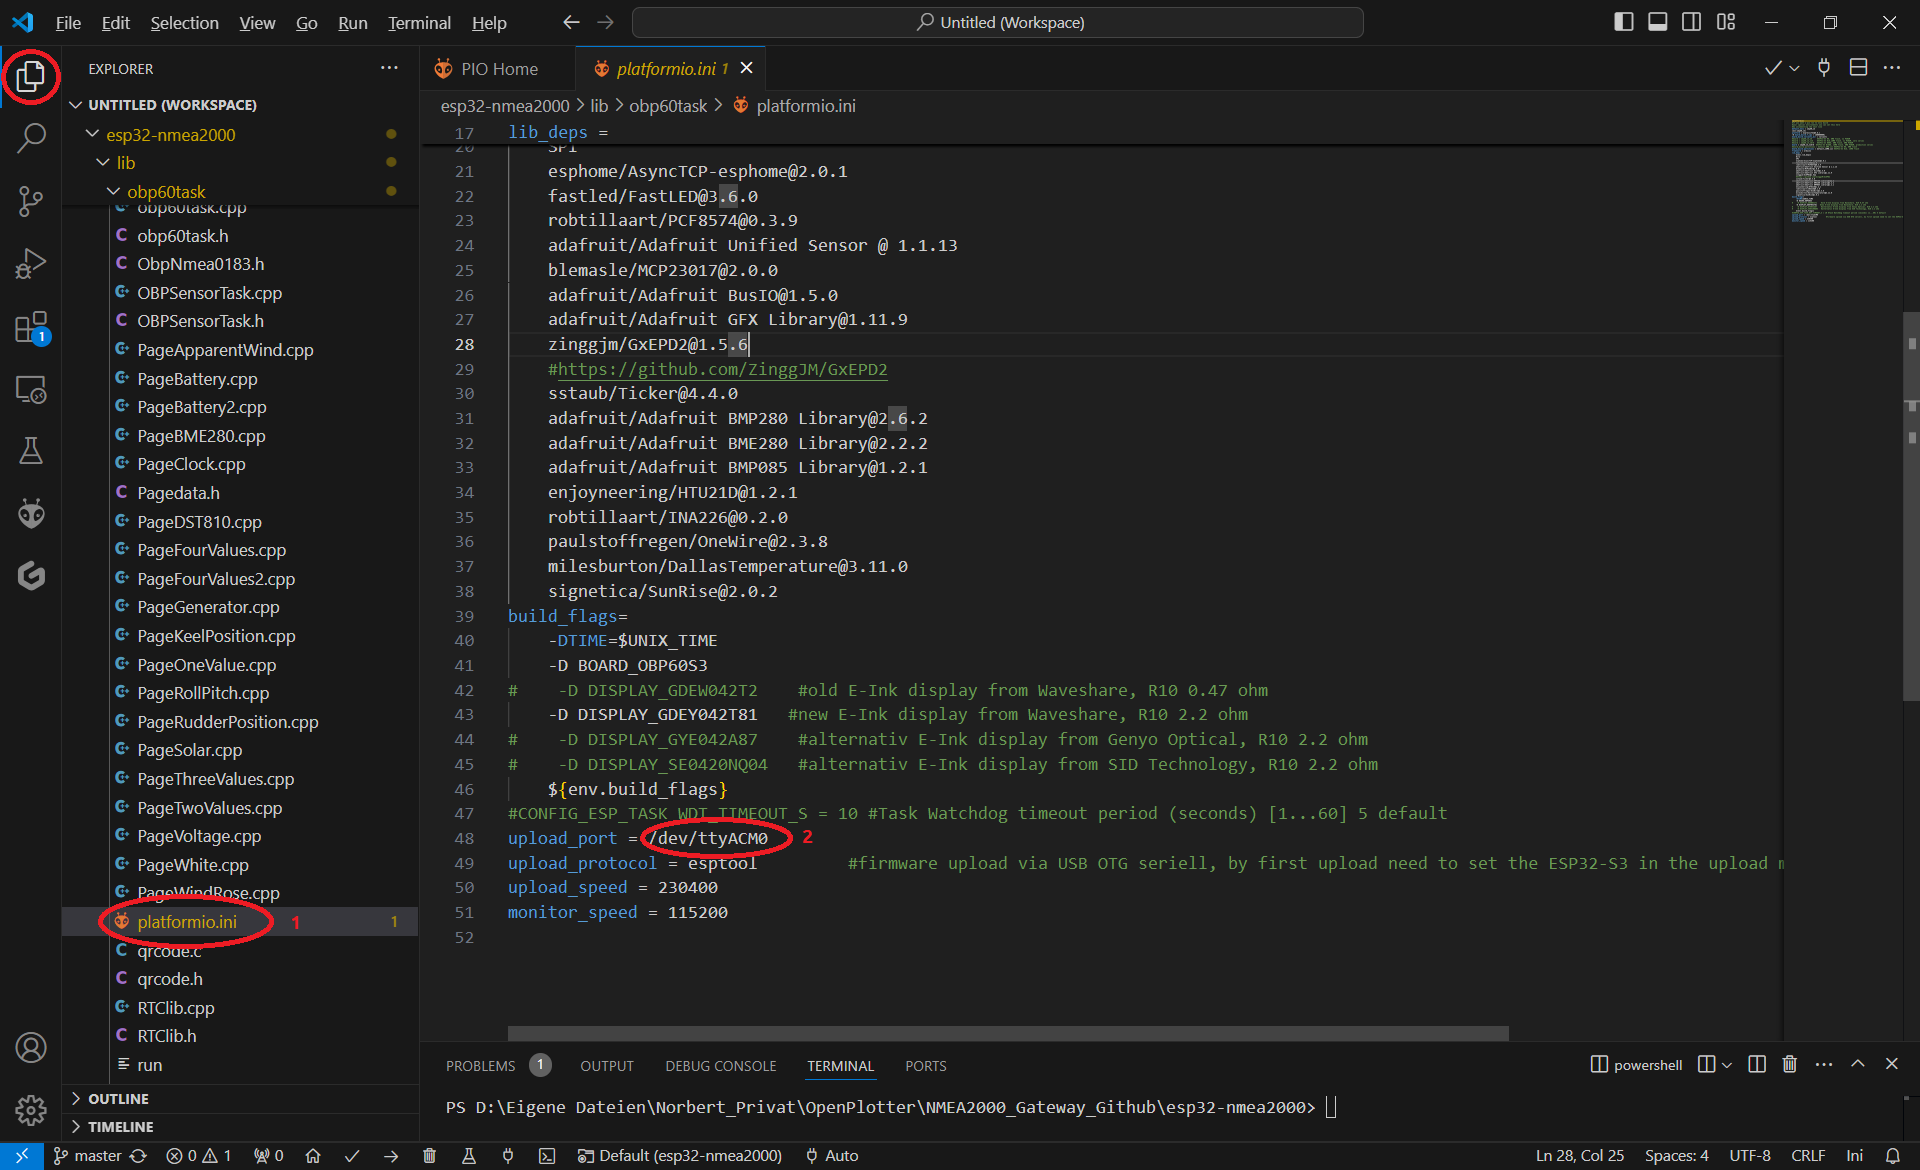
Fig.: Close configuration file and set serial port
Next, select the hardware environment to use by clicking on the bottom row. A window will then open at the top where you select the setting env:obp40_s3. This ensures that the firmware is created for the OBP40 hardware.
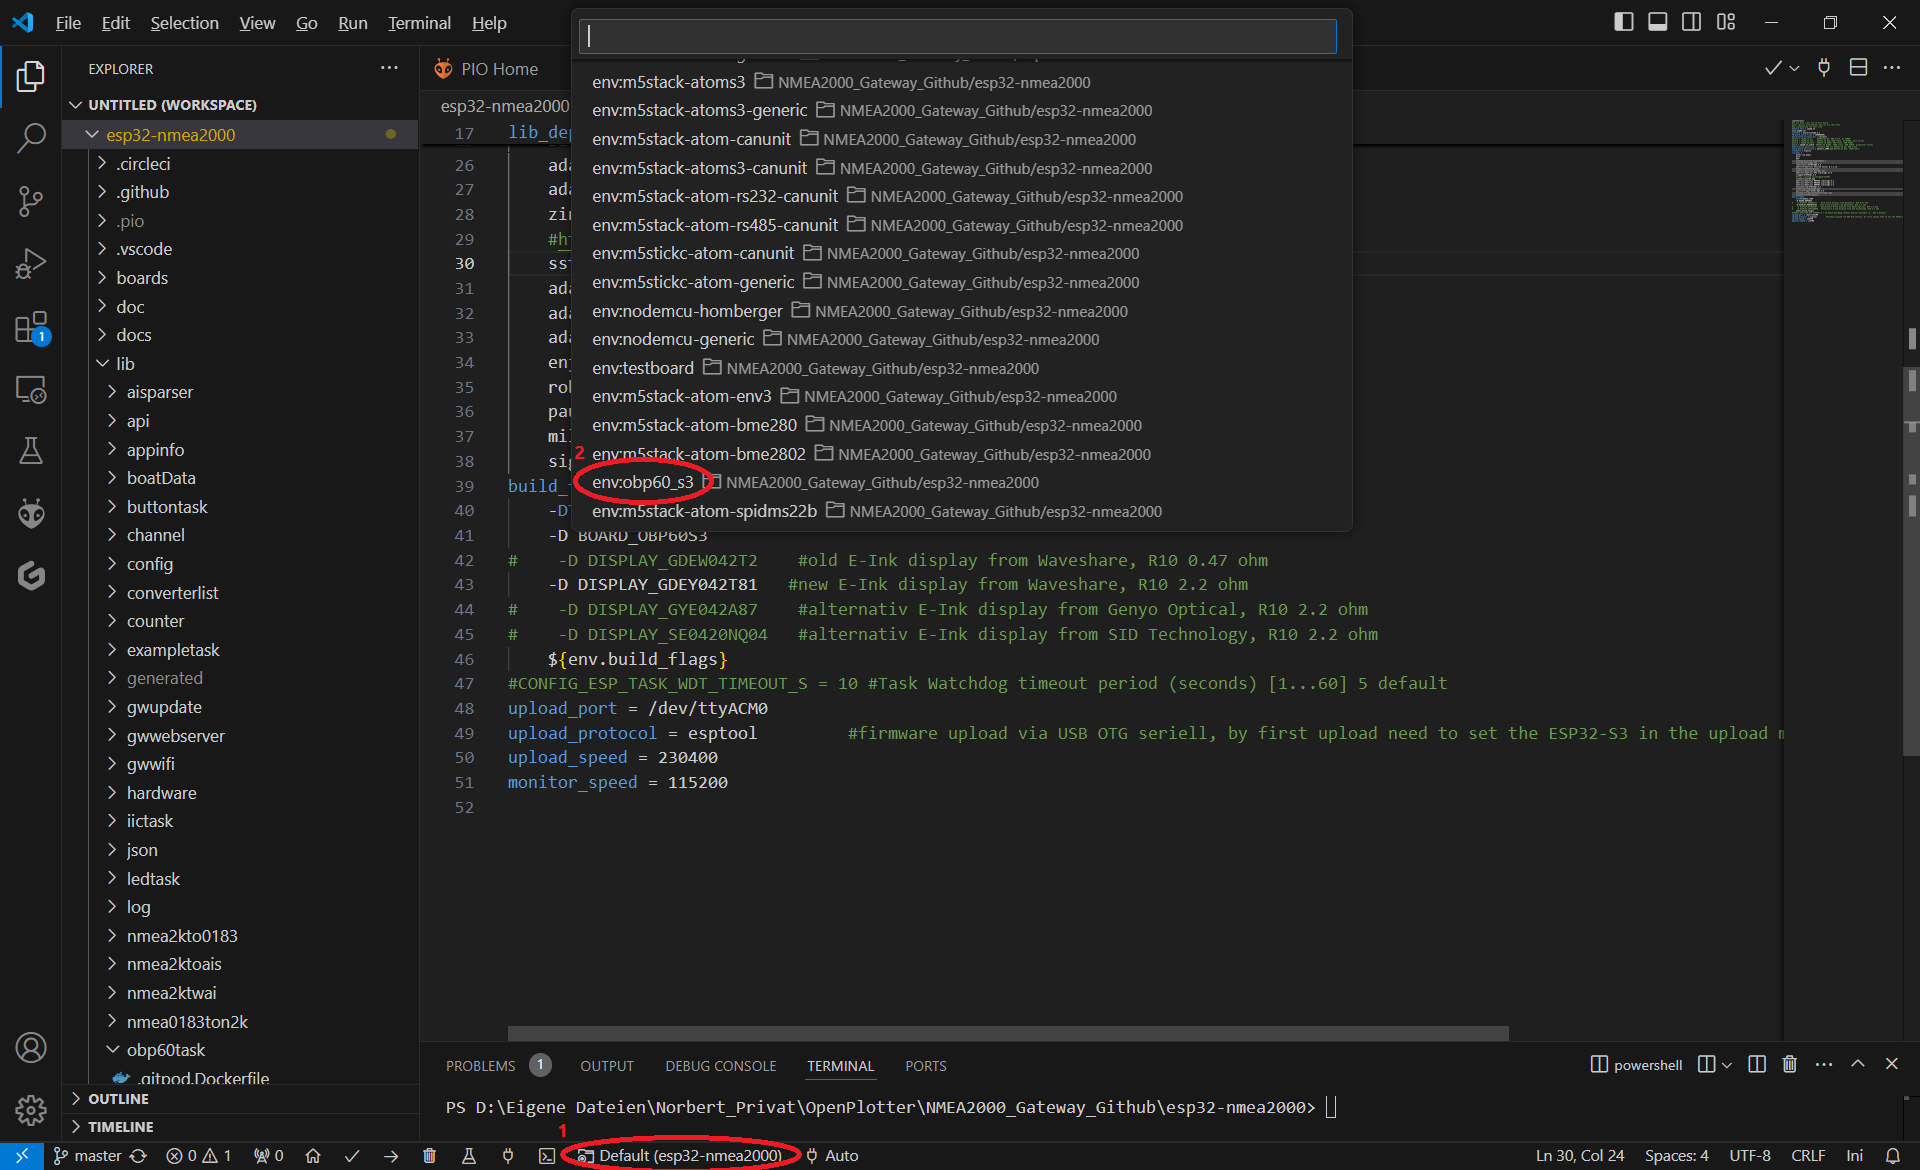
Fig.: Select hardware environment
Code modification and compilation
Once you have finished making your code changes, you can activate the compilation process by clicking the checkmark icon in the bottom row. Beforehand, ensure that the correct hardware environment, env:obp40_s3(esp32-nmea2000), is selected. The compilation process will take some time. At the end, you should receive a message in the terminal window informing you of the result.
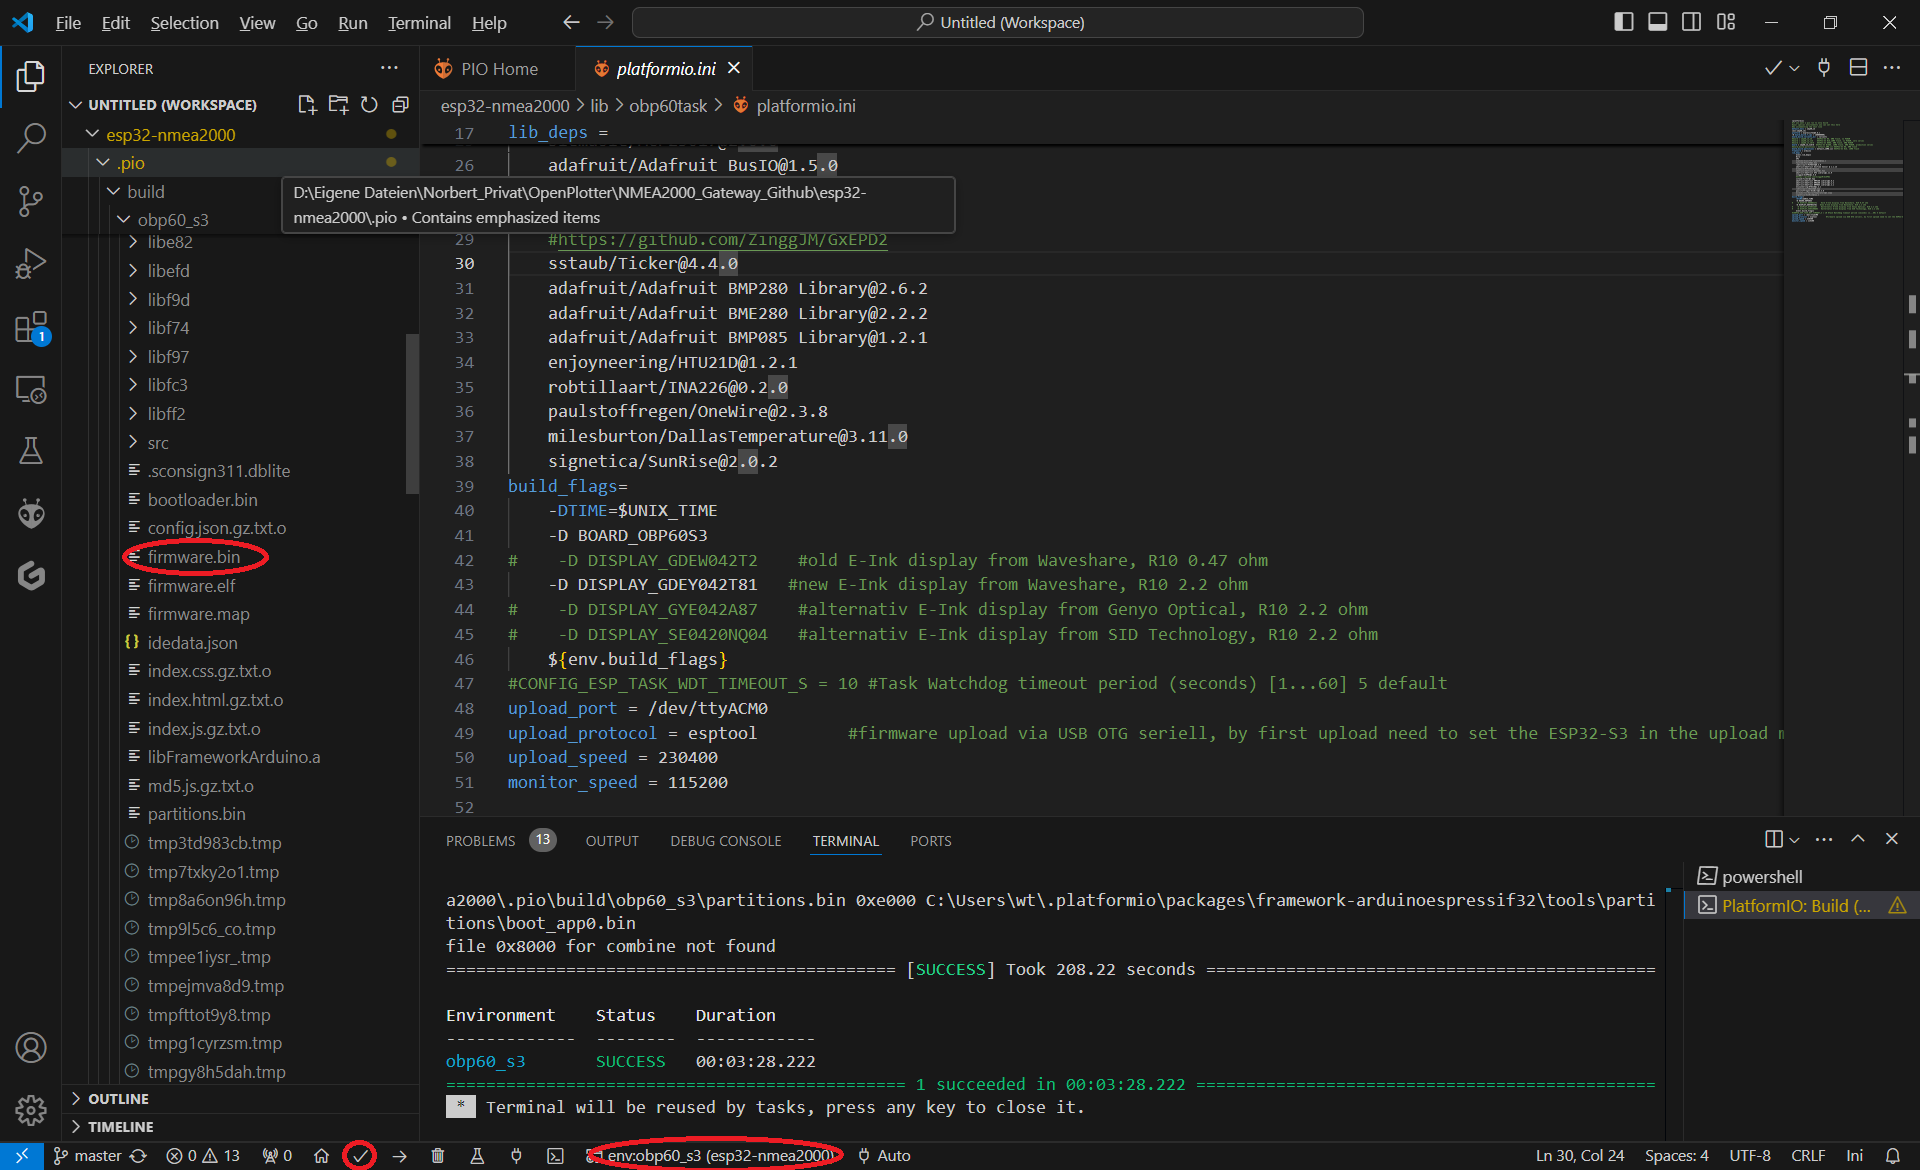
Fig.: Compilation
The firmware binary code, after compilation, is located in the directory: /esp32-nmea2000-obp60/.pio/build/obp40_s3
The files have the following meaning:
Bootloader.bin - ESP32-S3 Bootloader for Firmware
Partitions.bin - Partition table for the flash memory
Firmware.bin - Binary file as an update (firmware only)
Firmware.elf - ELF file for error tracking
Obp40_s3-all.bin - Binary file containing all components (bootloader, partition table, firmware, default settings)
Obp40_s3-dev20240820-all.bin - like obp40_s3-all.bin
Obp40_s3-dev20240820-update.bin - Binary file as update (firmware only)
Flashing the firmware
To flash the firmware onto the OBP40, connect the OBP40 to your PC’s USB port and then click the arrow icon in the bottom row. The firmware will first be compiled and then transferred to the OBP40. The terminal window will show the progress of each step.
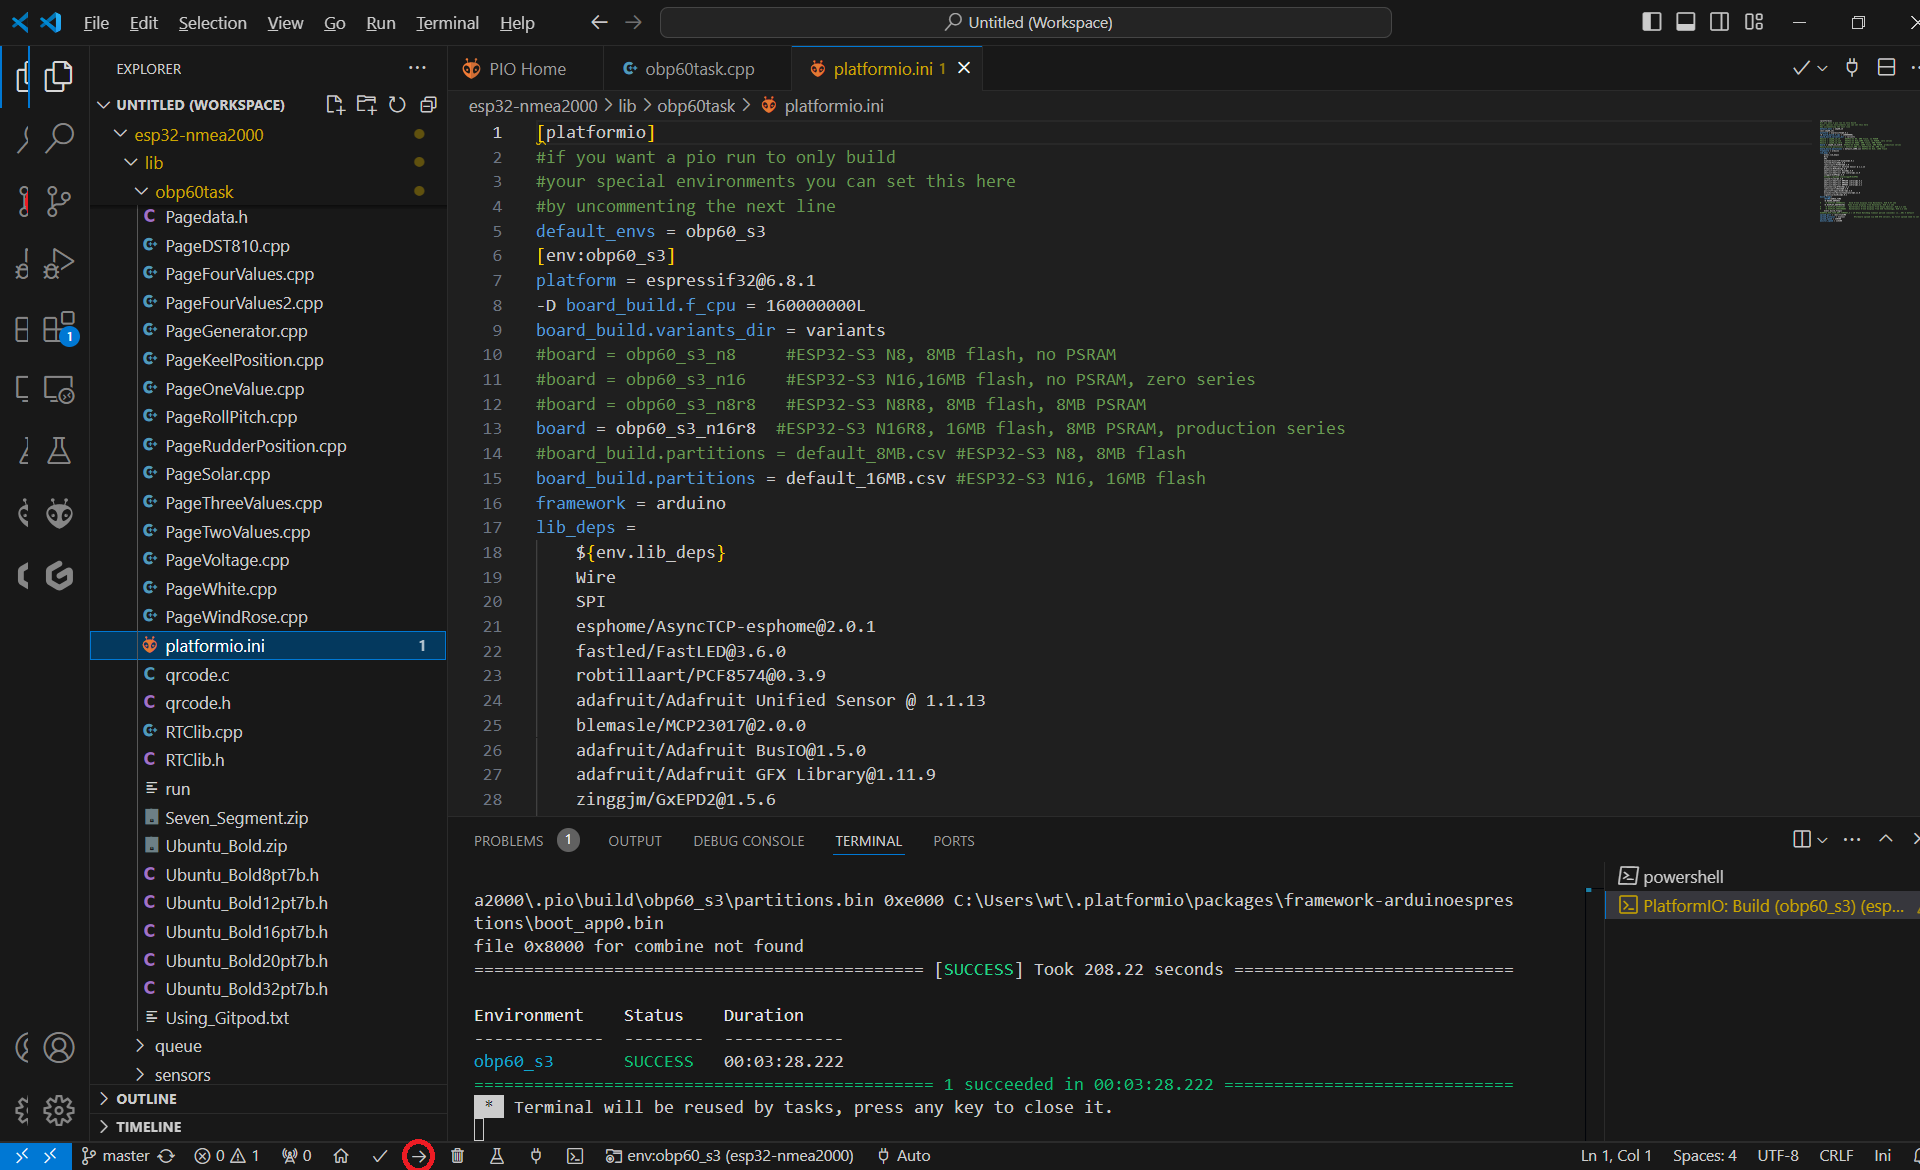
Fig.: Flashing the firmware
Hint
If a connection to the OBP40 cannot be established via the USB interface, you can manually put the OBP40 into flash mode. First, disconnect the USB connection. Then, open the rear cover of the OBP40 and press and hold the BOOT button. Next, connect the OBP40 to your PC using the USB cable. As soon as the USB interface is recognized, a sound will be emitted from the PC. You can then release the BOOT button. The ESP32-S3 is now in flash mode. Afterward, start another flashing process using the arrow icon, as shown above.
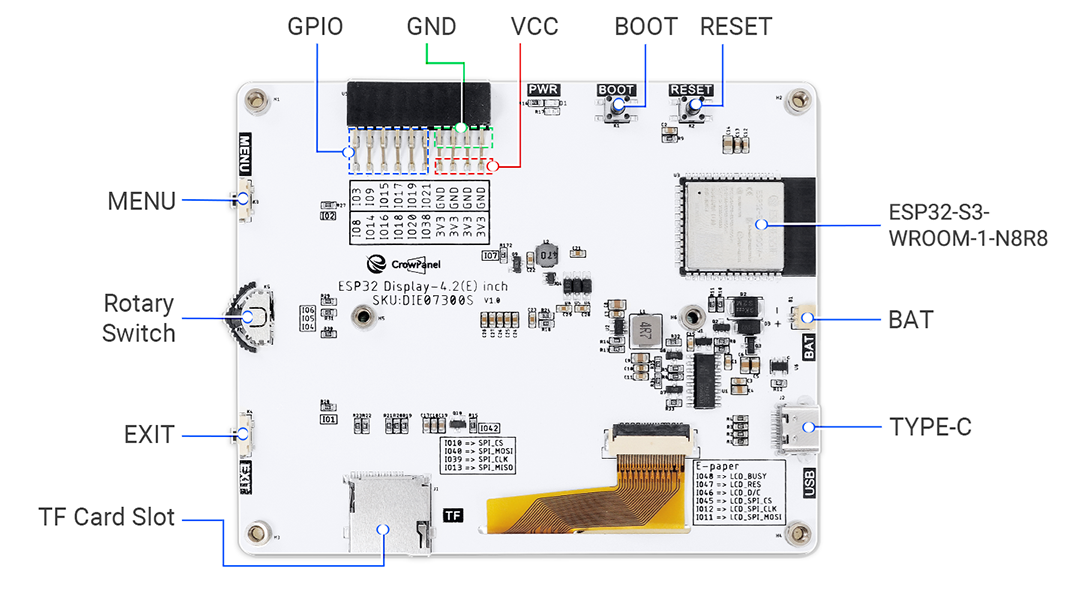
Fig.: Circuit board back of CrowPanel 4.2
Debugging the firmware
A simple way to troubleshoot is to output debugging information via the USB serial interface, which can be received on a PC using a terminal program. The OBP40 firmware includes functions for generating debugging output. Visual Studio Code has an integrated serial terminal. You can start it using the plug icon in the bottom row. The output will then appear in the “Terminal” area in the lower right corner. To stop logging, right-click on the currently running task and end it by clicking the trash can icon.
Note
Note that the interface speed is set to 115200 Bd 8N1 by default. The serial USB interface speed can be changed in platformio.ini under monitor_speed if needed.
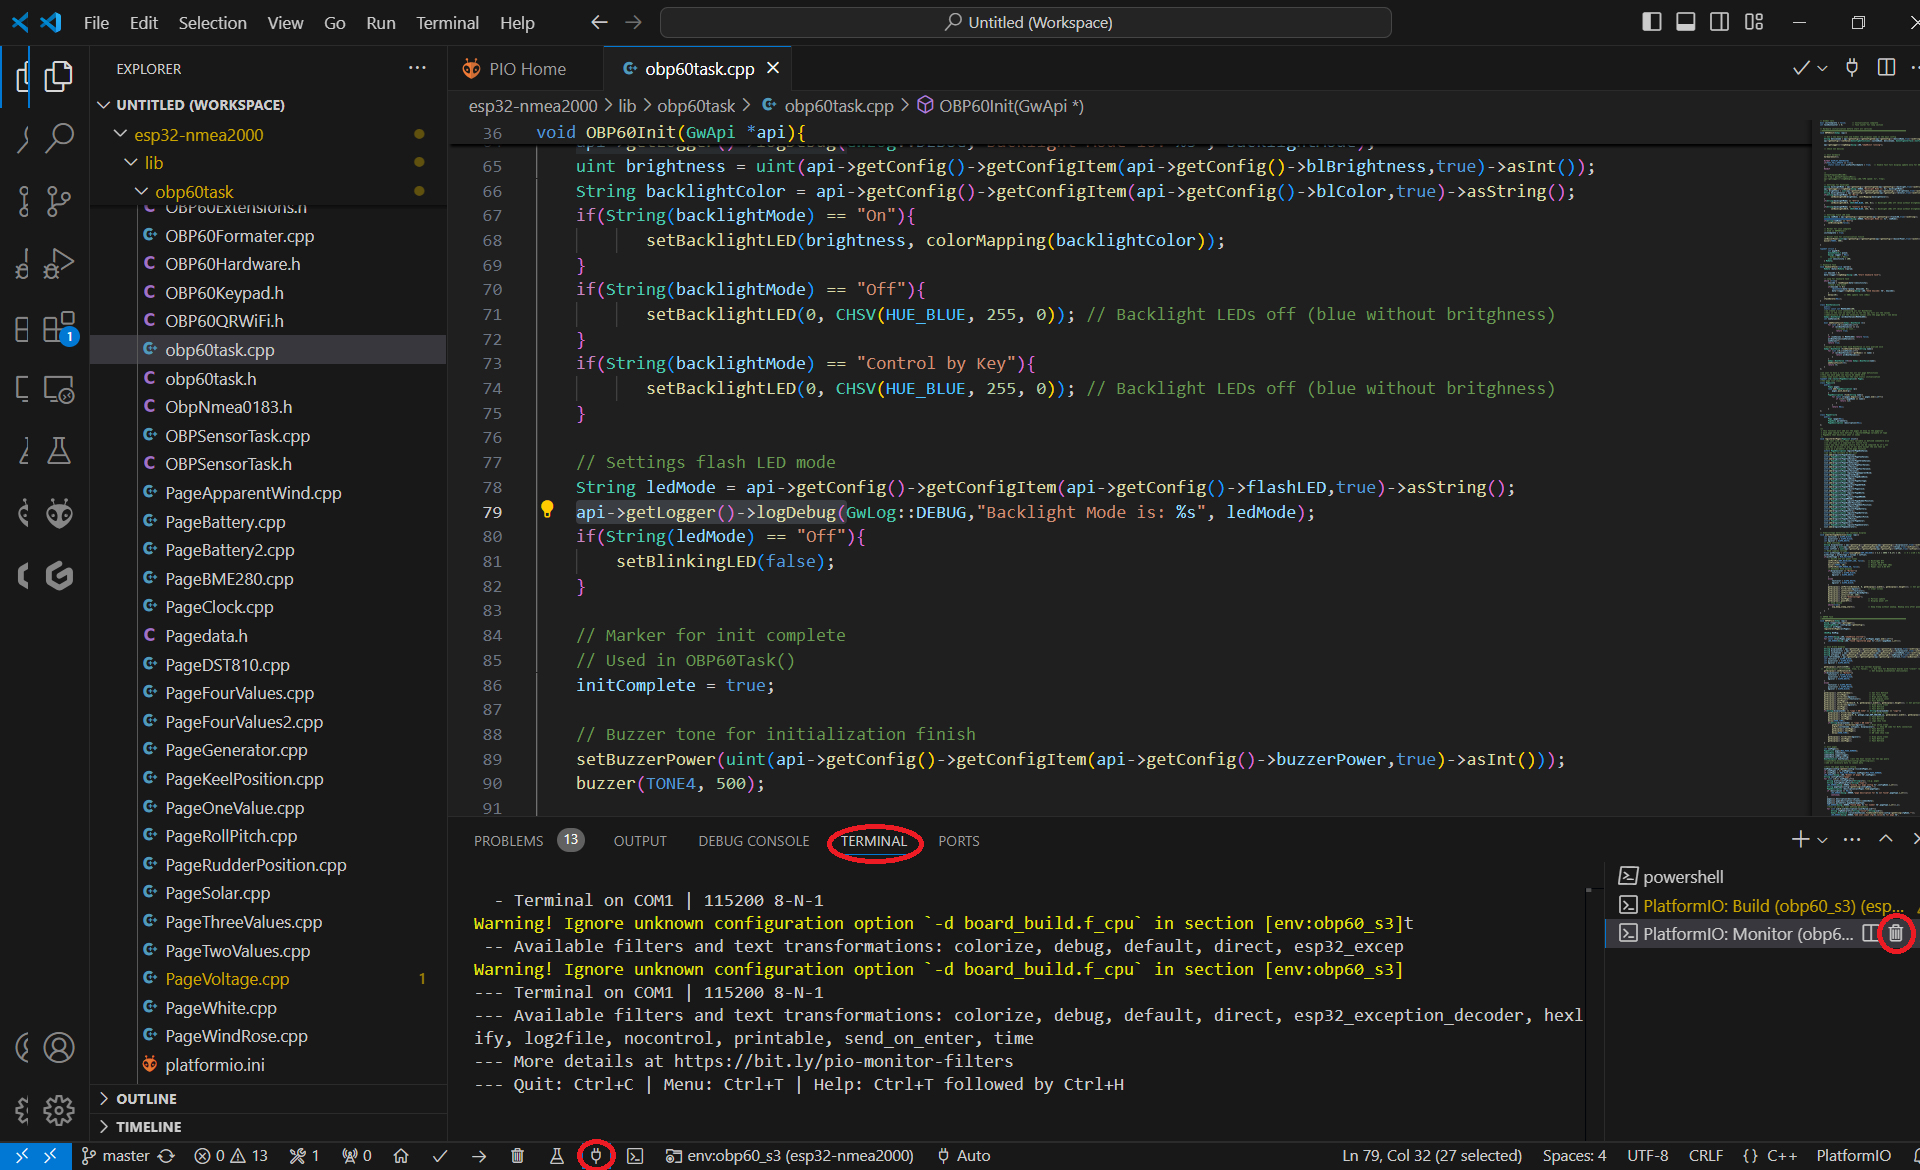
Fig.: Debugging via Serial Monitor
Source code update
To save source code changes to your GitHub repository, you can use the GitHub functionality of the Workplace. On the left, there’s an icon with a path branch and a small blue number next to it. This icon tells you how many changes have been made to files by the source code changes. Clicking the icon allows you to add a description for the changes. Following the dialog to the right of the blue Commit button, you can click Commit and Push. This will upload and save the code changes to your GitHub repository.
Hint
You can only commit and upload changes to Github if you include a description text for the code change.
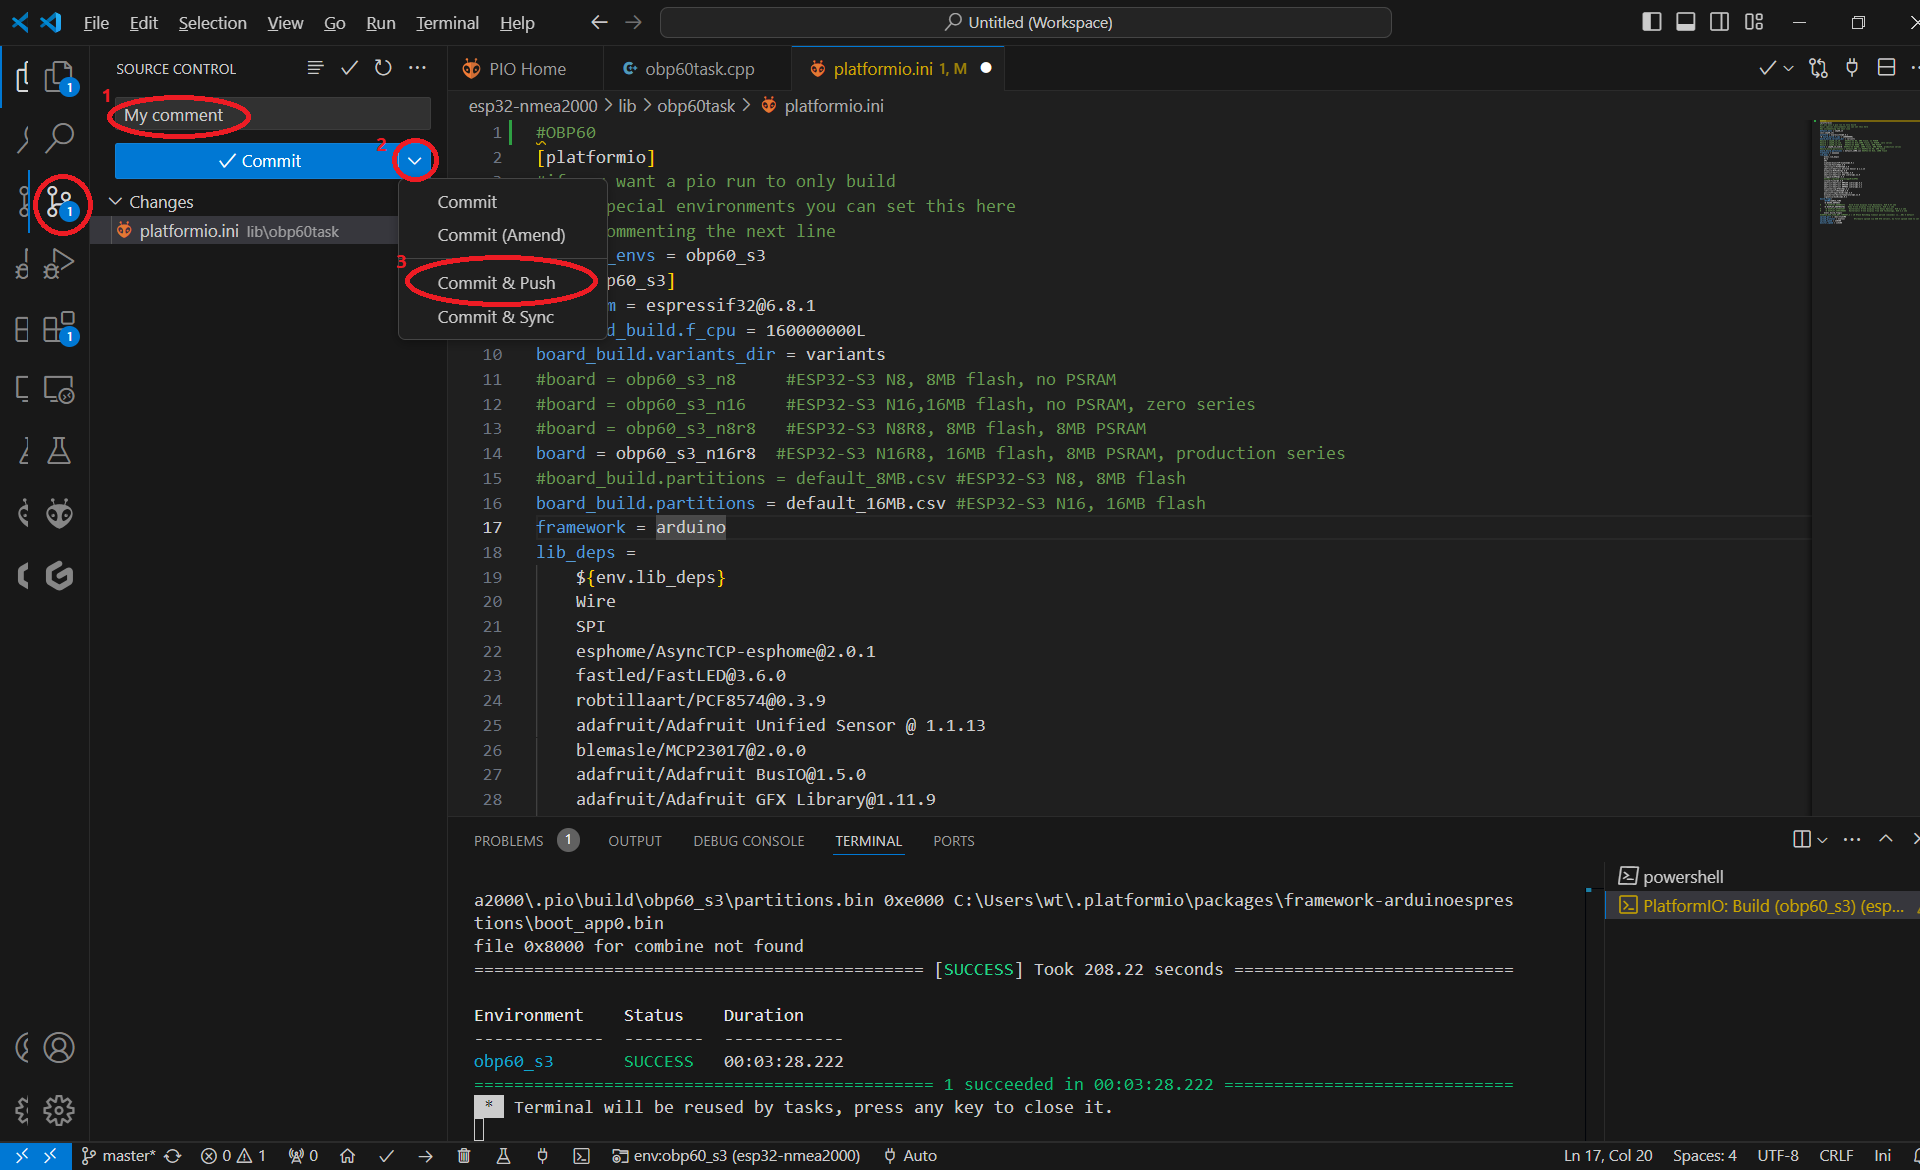
Fig.: Saving the source code to GitHub
If you want to pick up where you left off, you can download the latest version from GitHub to your Workplace and update it. To do this, click the path icon on the left and then the three dots at the top of the same window. You can then update your project by clicking Pull.
Hint
It is recommended to perform a pull before making any code changes to bring the project up to date, because a pull performed afterwards would overwrite the already changed code.
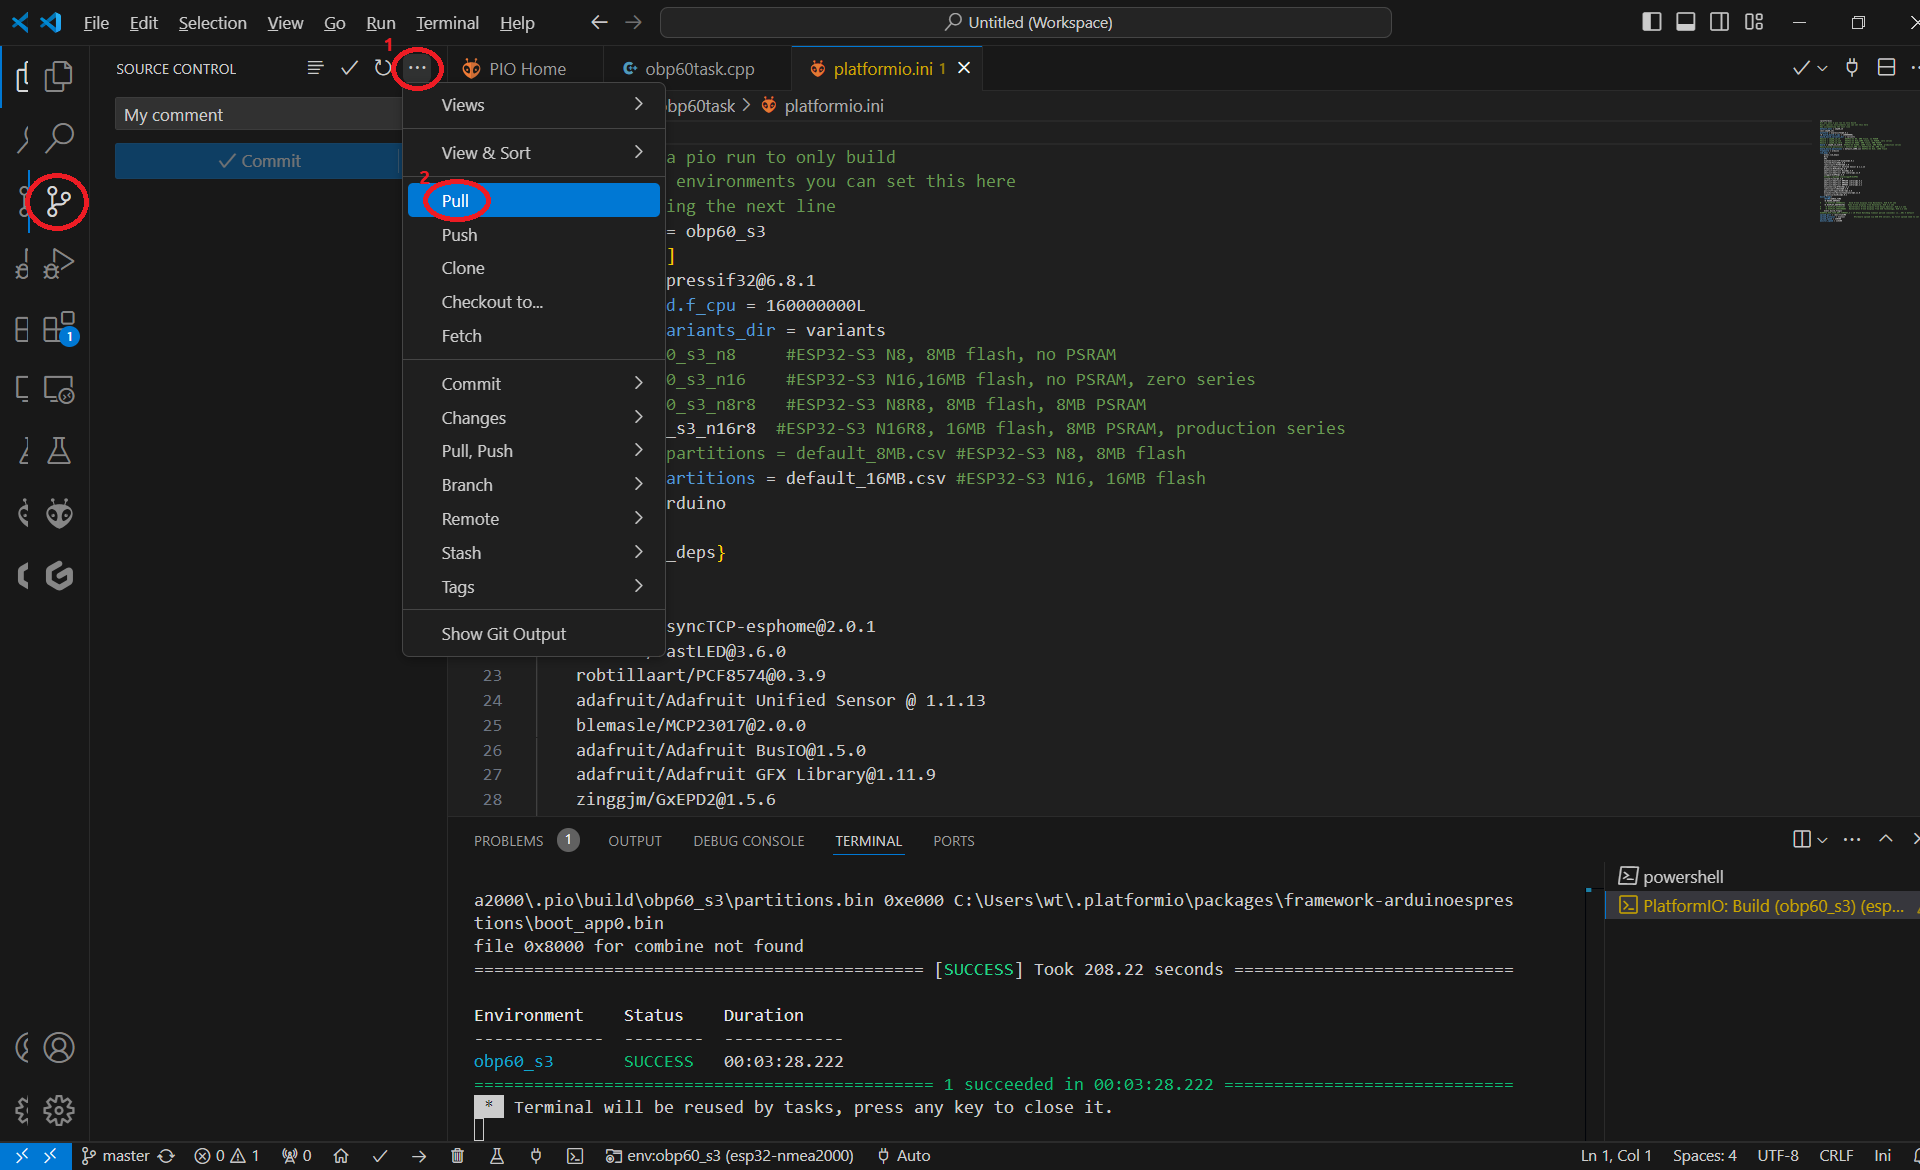
Fig.: Saving the source code to GitHub